|

|
The
central element in a bass is the
neck. I start making the neck by
selecting the wood. I look for
straight even grain without any
waves or traces of knots and
flatten one side of it on a
jointer, square it, size it with
the table saw and thickness
planer. This plank is then cut
into two matching sticks that
will form the outer bulk of the
neck blank. These outer pieces
are folded around the 3 inner
laminations to form a
5-lamination neck.
|

|
|
I
usually wipe down all the
gluing surfaces with acetone and
scratch them up with an old saw
blade for the best possible
adhesion. The glue gets rolled on
in an even layer and the whole
neck gets wrapped in wax paper to
keep glue off the floor. I place
the neck in my gluing press and
tighten the 10 screws that hold
even pressure of about 4000 lbs.
on the neck unit for 12 hours or
more.
|

|
|

|
Once
the neck has sat around for a
week so the moisture from the
glue has had a chance to escape,
I can square up the blank on the
jointer and planer and layout the
two necks it will make. The necks
are nested back to back to save
precious wood. Each neck gets
slotted to accept the truss rod
and carbon fiber reinforcing
spars. The ends get squared on
the table saw and checked for
absolute square-ness. I prepare
the fingerboard from
straight-grained, quarter-sawn
wood, after careful flattening
and thicknessing, the fret slots
are cut on the table saw with a
jig that places the slots
accurately to within 1/1000" over
the whole length. The fingerboard
is located on the neck with pilot
holes and pins and then glued
with hide glue in case it ever
needs to be replaced.
|

|
|

|
The
taper of the neck is established
with a fly cutter on the milling
machine. The edges of the
fingerboard are trimmed using a
taper jig on the table saw.> I
like to let the neck sit for
another week to let moisture
escape from the fingerboard.
|

|
|

|
I can
then install the truss rod and
using a temporary neck cap adjust
the rod for a small amount of
back bow so that when I sand the
fingerboard radius, the
fingerboard will have a small
amount of relief built in. I use
a compound radius an all my necks
which I accomplish freehand on a
big belt sander, I can check the
radius at each end with
templates.
|

|
|

|
I
re-adjust the truss rod to get
the neck dead flat. I clamp the
neck to a neck jig, which
supports the whole length with
adjustable pillars allowing me to
scrape, sand and check results
knowing that the neck isn't being
affected by my pressure or by
gravity. I will adjust the relief
with a sanding block, adding more
on the bass side to account for
the greater motion of the large
strings and to counter the
increased tension of the smaller
strings.
|

|
|

|
Once
the fingerboard is perfect, I
burnish it with steel wool and
attend to the fret slots; these
usually need to be deepened on
each end a few thousands deeper
than the tang of the fret wire
I'm using. I also chamfer the
slots to prevent tear-outs when
the neck is refretted.
|

|
|

|
Any
inlays are laid out and installed
along with edge-markers so they
can be leveled before the frets
are installed.
|

|
|

|
I love
the bass fret wire from DiMarzio.
It's hard and comes beautifully
polished, also the tangs are
narrow and don't need to be filed
down. I clean the fret wire with
acetone to remove any grease and
oxidation that might interfere
with glue. I bend the wire to
match the radius of each slot,
cut it to length and press it in
with a flexible brass caul on my
Dake, 1 ton press. The caul
flexes to match the radius of
each fret and with practice I can
get perfect fret depth so I never
need to dress the new frets.
|
|
With
ebony and other very hard
fingerboards I need to "set" the
fret tangs in to the sides of the
slots by standing on the
fingerboard while it is supported
at each end, otherwise the tight
frets will force backbow into the
neck. (Also it's nice to know a
neck can stand a little abuse
before it leaves the shop). I'll
inject a drop of super glue into
the end of each fret slot, it
gets spread instantly by
capillary action.
|
|

|
Shaping
the back of the neck is a crude
business, I use a ferrier's file
(normally for filing horse's
hooves) to rough out the shape
and follow up with a small block
plane and thin metal scrapers to
do the heel and the flare at the
nut. The end cap is machined and
then shaped with a drum sander on
the neck with the nut so that the
flare is continuous.
|

|
|
|
The
final neck rounding and profiling
is done with a wide strap of
sandpaper and checked with
templates and a straight edge.
Fine sanding can wait until the
body is ready for final sanding.
Ideally the customer can come in
and check the neck profile and
thickness at this point or I can
email tracings of the profile for
their approval. Getting the neck
this far takes about 15 hours of
work depending on the inlays.
|
|
The rails are
prepared generally using the same wood as
the neck laminations or fingerboard for
the sake of color coordination. Dowels hold the rails in
precise alignment while they are glued and
clamped. The rails add enough width to the
neck blank to hold the pickups and bridge
assembly. The cavities for these parts are
routed using a vertical milling machine to
exact tolerances with a slight added width
to account for wood shrinkage in dry
winter weather. Channels and tunnels for
wiring are milled and drilled along with
cavities for batteries and electronic
tuner. The dovetailed slot for the battery
cover is also cut on the mill.
coordination. Dowels hold the rails in
precise alignment while they are glued and
clamped. The rails add enough width to the
neck blank to hold the pickups and bridge
assembly. The cavities for these parts are
routed using a vertical milling machine to
exact tolerances with a slight added width
to account for wood shrinkage in dry
winter weather. Channels and tunnels for
wiring are milled and drilled along with
cavities for batteries and electronic
tuner. The dovetailed slot for the battery
cover is also cut on the mill.
Woods for the
body wings are selected according to the
figure, color and sonic properties desired
by the customer. I usually use a harder,
heavier wood on the front with a softer,
more resonant piece on the back. Curly and
quilted maples are favorites for the
beautiful figure and bright tone they
impart. The deeper the figure the more
troublesome it is to carve and shape but
the more rewarding the results. The
highest grades of maple are of a uniform
bright white color that backlights a stain
or tint with stunning results. Other
popular body tops are walnut, koa and
zebrawood. Body backs are often of alder,
swamp ash, butternut, sassafras, soft
maple, walnut or narra.
The chosen
planks are cleaned up to expose the figure
and then clear plastic body templates are
moved around until the best match of
figure is obtained. Often I try to
incorporate swirls or patterns in the
grain that follow the body outline. I
spend hours and even days contemplating
(agonizing) how to make the best use of a
given piece of wood for a body. Once the
outlines are traced and cut out on the
band saw, they get cleaned up with the
belt sander. The gluing surfaces are
flattened on the jointer and then
thicknessed before they are painstakingly
scraped and fitted for a perfect joint.
The tops and backs are glued and clamped
heavily to eliminate the possibility of
'creep' along the glue lines. The wings
are then milled for electronics cavities
and to establish the outlines of the
carved areas. I use a band saw to rough
out the contours and round off the corners
before doing the heavy carving with gouge,
round bottom plane, rasp and scraper
blades.
The wings and
rails need to be carefully mated to avoid
glue lines, I use chalk on one part to see
where the high points rub on the other. Dowels line up the wings and
I try to glue them as soon as things are
tight, before the wood gets a chance to
move on me. I can usually get by with 2
clamps, doing the lower wing first and
then the upper. For final shaping, some
broad areas and convex curves can be
cleaned up on the belt sander before I
resort to hand sanding with blocks and
pads. With heavily figured wood, I must
alternate scrapers and sanding with
special free cut files. Sometimes a scrap
of broken glass is the only tool that can
work figured maple.
on the other. Dowels line up the wings and
I try to glue them as soon as things are
tight, before the wood gets a chance to
move on me. I can usually get by with 2
clamps, doing the lower wing first and
then the upper. For final shaping, some
broad areas and convex curves can be
cleaned up on the belt sander before I
resort to hand sanding with blocks and
pads. With heavily figured wood, I must
alternate scrapers and sanding with
special free cut files. Sometimes a scrap
of broken glass is the only tool that can
work figured maple.
Sanding is an
all-day chore best done out-of-doors if
weather permits. I designed and built a
down draught table to filter out dust for
indoor sanding but it makes for a noisy
environment. I own 4 different orbital
sanders that I've tried over the years but
now do most sanding by hand to keep dust
down and to have complete control over the
complex curves of the body and neck. Final
rubbing is done with 0000 steel wool. By
this time I can see the glow of the wood
and pick out even the slightest scratches
or undulations of the surface.
Holes are
drilled for the pots, switches and output
jack along with mounting holes for the
strap buttons and tuners. The whole bass
is then dusted, vacuumed and washed down
in acetone. Stain is applied, sanded then
touched up and re-sanded. If oil is the
final finish it is applied with cotton
pads under a heat lamp to promote deeper
penetration and even drying. The first
coat is allowed to dry overnight and the
second coat is applied with coarse burlap
to meld into the first coat and avoid
sanding. The third and successive coats
are applied alternately with finest steel
wool or bare fingers and rubbed into the
grain pores until these are filled. If a
high gloss is desired a thin coat of oil
is rubbed in with the fingers as it dries
it can then be burnished to a gloss with
the heat of friction. (A great way to get
blisters).
Once the bass
has sat a few days I can paint all the
interior cavities with conductive
shielding paint, running it down through
the wiring tunnels. I don't do lacquer
here so I won't get into that except to
say it adds 2 weeks and 10 hours to the
construction time. It's a real trick to
keep the lacquer out of the sliding
control covers and to get it into the
recesses of the D shape. I use razor
blades for leveling, 4 grits of sandpaper
and 4 stages of compound and paste wax on
lacquer. Buffing it out is an art that
takes lots of practice. The overhead
investment for spraybooth, explosion proof
safety wiring, compressor, spray guns,
polution and dust control filters, special
lighting and buffing equipment have kept
me from from getting involved directly
with lacquer.
The titanium
truss rod is hand threaded in several
passes because the material is so hard.
The rod is bent double using heat from a
blowtorch and a gigantic machinist's vice
to forge the bend precisely. 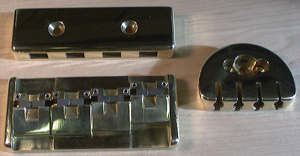 Hardware
milling is done in batches of 5 or 10 sets
of each string spacing. 10 sets equals 190
separate parts and takes at least 2 weeks
to complete. My mill is a cheap Taiwanese
machine that I've rebuilt and improved
many times but I still need to check
tolerances on every part with a digital
caliper. Figure 10 hours per set including
de-burring, sanding, buffing, polishing
and cleaning. I send out plating and
anodizing to avoid EPA waste treatment
regulations. Plating is an art in its own
right and I don't mind paying the $50 to
get it done well. Plated parts need to be
resized to account for the 1/1000"
additional thickness. Mating surfaces need
to be lapped on a diamond-encrusted plate
to flatten them again. Hardware
milling is done in batches of 5 or 10 sets
of each string spacing. 10 sets equals 190
separate parts and takes at least 2 weeks
to complete. My mill is a cheap Taiwanese
machine that I've rebuilt and improved
many times but I still need to check
tolerances on every part with a digital
caliper. Figure 10 hours per set including
de-burring, sanding, buffing, polishing
and cleaning. I send out plating and
anodizing to avoid EPA waste treatment
regulations. Plating is an art in its own
right and I don't mind paying the $50 to
get it done well. Plated parts need to be
resized to account for the 1/1000"
additional thickness. Mating surfaces need
to be lapped on a diamond-encrusted plate
to flatten them again.
Pickup mounting
is done with thick foam rubber for
springing them up and soap on the screws.
The main electronics cavity is further
shielded with conductive, adhesive-backed
copper foil, which is seam soldered and
grounded to the conductive paint. The pots
and electronics are pre-wired on a jig before final
connections are made and the pots
installed. The active modules need to be
fastened in place with Velcro or foam
double-sided tape. All the ground areas
are tested for continuity with a meter
before the hardware is installed. String
slots can then be cut into the nut and
strings installed. Fretwork is checked
once again on the neck jig under full
string tension with the truss rod
adjusted. Intonation at the bridge is set
and then checked at the nut as well.
String spacing and bridge height is
optimized before a final intonation
check.
are pre-wired on a jig before final
connections are made and the pots
installed. The active modules need to be
fastened in place with Velcro or foam
double-sided tape. All the ground areas
are tested for continuity with a meter
before the hardware is installed. String
slots can then be cut into the nut and
strings installed. Fretwork is checked
once again on the neck jig under full
string tension with the truss rod
adjusted. Intonation at the bridge is set
and then checked at the nut as well.
String spacing and bridge height is
optimized before a final intonation
check.
Batteries are
installed and the bass is tested and
played for an hour or two to determine
proper pickup heights and finalize the set
up. The best test is a rehearsal or a gig
so I can really hear how it sounds up
against guitars and drums. I'll often get
someone else to test it for me just to
have a clean opinion. I'll note down any
idiosyncrasies or general observations on
the order sheet for future reference.
Strings are removed to allow the frets to
be polished and to remove any steel wool
threads from the pickups. If new strings
are needed they are installed before the
bass is packed with its instructions,
tools and invoice.
Total time about
100 hours over 3 months. Total cost: wood;
$200- $500, metal and plating; $100,
electronics; $300, strings, screws, oil,
etc; $25.I figure I can make $15 an hour
if I don't screw up too much. If I add in
wood shopping, travel, time messing with
computers, time cleaning the shop and
rebuilding machinery. Time harassing,
threatening and cajoling suppliers and
talking to earnest customers, I can count
on $5 an hour.
|