|
4805 N.
Borthwick Ave Portland, OR 97217 USA |
Home | The King Bass | Design | Order | David King | Resources | Feedback |
|
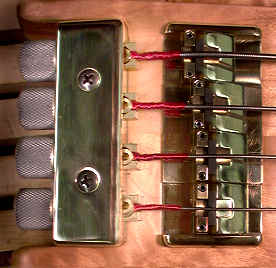
Truss rod adjustments | Bridge adjustments | Intonation adjustments | Pickup height | General maintenance ADJUSTMENT AND MAINTENANCE: The first job you will probably need
to undertake will be changing your strings. With the bass placed on a flat surface
loosen the string tension completely by unscrewing
the tuning knobs until the strings are slack. Then,
using the 1/8th" Allen key, remove the large
setscrews that hold down the ends of the strings at
the nut. Put these setscrews in a safe place. Pull
on each string while continuing to loosen the tuner
knobs until you can lift the ball-end out of its
holder in the tuner block.
When the strings are off the instrument it is possible
for the bridge and nut to fall out of the bass, If
the bridges hits the floor the saddles will fall out.
Insert the ball-ends of
the new strings in the appropriate holders.
tighten the "G" tuner knob so that 1/2 the ball-end
is hidden in the tuner block. Put the string
through first slot in the nut block, replace and
tighten down the set screw with the l/8th" Allen
key. I suggest using the short end of the Allen
wrench as the lever so as not to over tighten the
setscrew and cut through the windings. Repeat the
above procedure for the "D", "A", "E" (& "B")
strings, however with each TRUSS ROD ADJUSTMENT: The truss rod nut is located
in the center of the string block at the end of the
neck. Tightening the nut clockwise with an 8mm or
5/16" socket will bend the neck back. Loosening the
nut will allow the string tension to pull the neck
forward. Ideally, the neck should have a slight
amount of relief or forwards curvature. This is
easily checked by pressing a string down at the
first and 24th. fret simultaneously. There should
be a space of approximately l/20"(the thickness of
a cardboard match) between the string and the frets
at the middle of the fingerboard. Too little neck
relief (neck too straight or bent back because the
truss rod is too tight) will cause the strings to
buzz at the nut end of the fingerboard. Too much
relief (truss rod too loose) will raise the strings
too high off the fingerboard and may result in the
strings buzzing at the top of the fret board. A
heavy plucking style will require more neck relief
than a light playing touch. To make the adjustment,
turn the nut in the desired direction (Clockwise to
tighten, counterclockwise to loosen, 1/8th of a
turn at a time and re-tuning the strings to pitch
before checking the results. If the brass nut
doesn't turn readily, don't force it to the point
of stripping the threads off the nut. It may help
to remove(unscrew) the nut and grease the threads
with a heavy bearing grease(bicycle lube).
Loosening the strings and pulling the neck in the
desired direction while turning the nut may also
help. ADJUSTING THE BRIDGE: Adjustment of the string
height at the bridge is accomplished by turning the
two setscrews on the top of each bridge piece with
a .050" Allen key. First loosen the locking set
screw on "G" string side of the bridge back plate.
(This screw locks the bridge pieces in place once
the string height and intonation adjustments have
been made.) In general I turn each screw one full
turn in the desired direction and then check the
results. It is important that each pair of height
adjustment screw be turned an equal distance so
that the bridge pieces remain level and both screws
touch the base plate. String height is a matter of
personal preference but there is a limit to how low
the strings can be set without buzzing. A low
action demands careful fingering and soft plucking.
Be sure to lock the bridge pieces in place again by
tightening the locking setscrew on the end of the
bridge plate or you may loose one the next time you
change your strings. The string spacing adjustment
is accomplished by one of two means, depending on
whether you have roller bridges (Serial #s 001-006)
or the graphite saddle-in-a-slot bridge. For the
roller type, loosen the string part way until you
can lift it out of the roller. Spin the roller on
it's threaded shaft to move it from side to side.
For the slotted type, loosen the locking set screw
(.050 Allen key) at the back of each bridge
piece(facing the tuner block) and push the string
and it's saddle to the desired position then
retighten the locking screw. ADJUSTING THE INTONATION: No setup would be complete
without checking the instrument's intonation, it's
ability to play in tune over the entire
fingerboard. An electronic tuner is necessary to do
this accurately. The locking set screw on the G"
string end of the bridge must be loosened with the
.050 Allen key before you can slide the bridge
pieces. Start by tuning the open strings to pitch
and then checking the 2nd octave harmonic (over
24th fret) then try fretting at the 24th fret. The
idea is to compare this fretted E, A, D or G with
it's Harmonic equivalent, if the fretted version is
sharp then the string must be lengthened by sliding
the bridge piece back towards the tuning block. If
the fretted note is flat, the string must be
shortened by moving the bridge piece forwards,
towards the pickups. Generally the thinner strings
(G and D) have their saddles set near the middle of
the bridge plate while the fatter string's saddles
are set progressively further back. Exposed or
"taper" core strings are usually set in a straight
line across the middle of the bridge. After sliding
a bridge piece the string should be re-tuned and
checked again before re-tightening the locking set
screw on the treble end of the bridge. Setting the
intonation on a fretless is the same but a
temporary "fret" such as the 050" Allen wrench can
be placed under the strings at the 24th position to
aid in getting an accurate pitch. ADJUSTING PICKUP height: The height of the pickups has
some effect over the tone of the instrument. In
general pickups can be raised to increase their
output. Some players like to be able to feel the
top of the pickup underneath the strings when
plucking. The pickups can also be tipped to favor
the low strings or high strings. This is useful to
balance the sound of the different strings when
using heavy equalization. On instruments with two
pickups, it may be necessary balance the volumes of
the two pickups by raising the bridge pickup
slightly. A good starting point is 1/8th" below the
"E" or "B" string for the bridge pickup and 3/16
ths" below for the neck pickup. Be sure to push the
strings down at the 24th fret to make sure the
pickup won't hit the strings. MAINTENANCE: If your instrument came with
an oiled finish it will be necessary to clean and
re-oil it from time to time. Oiling not only makes
the bass look it's best, it also stabilizes the
wood by sealing out changes in moisture. If you
live in a humid climate or tend to sweat a lot, you
should consider re-oiling yearly or even monthly as
sweat dissolves the oil, leaving the wood
unprotected. The best way I have found to clean and
oil is by impregnating a small pad of 0000 (extra
fine) steel wool with a high quality, marine grade
refinishing oil (such as Birch wood Casey "Tru
oil", available at your local gun emporium) and
rubbing lightly with the grain. If the instrument
is dirty, the new oil will dissolve the grime.
Using steel wool helps clean the wood and prevent
excess layers of finish from building up. Start by
doing a small portion of the body at a time and
then use a clean cloth or paper towel to rub off
all the excess oil. It is easier to oil the
instrument with the strings off, it is also best to
cover the pickups with masking tape to keep bits of
steel wool from getting stuck to the magnets. Be
sure to remove the battery and control panel covers
before the oil dries or they will get stuck. If
this should happen or if the covers swell up due to
the weather, use a hair dryer to gently shrink them
back to size and loosen up the dried oil in the
joint. Then moisten your thumb tips and push the
covers off slowly, one thumb on each corner. Try to
avoid prying at the covers with sharp objects, the
blow dryer trick always works. If the covers get
too loose then resort to a layer of scotch tape on
the beveled edges of the cover. //___________\\ THE FINGERBOARD is best cleaned and protected
with lemon oil or linseed oil. Stay away from
products which contain silicone or tung oil. Use a
small piece of cloth or paper towel to apply the
lemon oil. Allow it to soak into the wood for a few
minutes before wiping off the excess. THE BRASS HARDWARE will oxidize if not cleaned
regularly. It can be polished and protected for a
short while with any automotive sealant, paste wax
or just a metal polishing paste (Flitz, Simichrome.) Be sure to cover
adjacent wood with masking tape before polishing so
that the black oxide won't get into the wood grain.
If left alone the brass will eventually gain a
patina of age and funk. THE PARTS LIST, If you happen to loose parts or
screws from your bass you may get more from me at
any time. It may be quicker and easier to ask for
the screws and wrenches at your local hardware
store. They are as follows: String lock down
screws: 1/4"-20 x 1/4" (stainless steel).(These
should be filed down on the bottoms so they won't
cut through the strings).Bridge height adjustment
screws: 4-40 x 3/8" (stainless steel).Bridge saddle
locking screws: 4-40 x 1/8" (stainless steel).Truss
rod adjusting nut: "Gibson" style, 10-32 threaded
brass. (Available at most guitar stores and repair
shops). Screws holding the nut block: 3/4" x 6
stainless oval Phillips head. Screws holding the
tuning block assembly to the body: 1 1/2" x 8
stainless oval Phillips head. Screws holding the
strap buttons on: 1 1/4" x 6 stainless oval
Phillips head. Screws for the output jack and some
early cover plates: 3/8" x 4 stainless oval
Phillips head. (Same as Fender pickguard
screws.) TOOLS: Truss rod wrench:
"Gibson" style or 8mm or 5/16" socket. (I use a
1/4" Allen Wrench with two corners filed flat as a
handle). String changing wrench: 1/8" Allen. Bridge
adjustment wrench: 050" Allen. Small screwdriver:
#1 PT Phillips. Large screwdriver: #2 PT Phillips.
All other parts are proprietary and only available
directly through me unless you know a willing
machinist. Prices for all replacement parts are
very modest. |
|
|
 successive
string, leave a little less of the ball-end exposed
before locking down the free end of the string. I
do this because the "G" string needs to be pulled
1/8th" further than the "E" to come into tune.
Before putting any tension on the strings, cut the
B, E and A strings 1" (2.5cm) past the end of the
nut block and then bend all the strings up at a 90
degree angle behind the locking set screw (this
helps lock the windings to the core). Finally, cut
the strings again flush with the top of the nut
block. A layer of thick tape (electrician's tape)
over the cut ends will help avoid scratches and
puncture wounds. Another option is to not cut the
strings off at all but simply wrap then in a tight
loop above the nut block. This is the best approach
if you change strings frequently. If you choose to
cut string ends off, you must re-tighten the
setscrews to lock the string core in place. You can
now bring the strings up to pitch. Once in tune it
is necessary to push each string down as it passes
over the nut and the bridge, do this by pressing
down on the string with your thumbs on either side
of the bridge and also immediately in front of the
nut. This will establish the ends of the nodes at
the bridge and nut and make the bass intonate
correctly. If you are changing the gauge or brand
of string you should check the instrument's
intonation with a tuner .Be sure to check the
tightness of the "hold down" set screws before
going on stage.
successive
string, leave a little less of the ball-end exposed
before locking down the free end of the string. I
do this because the "G" string needs to be pulled
1/8th" further than the "E" to come into tune.
Before putting any tension on the strings, cut the
B, E and A strings 1" (2.5cm) past the end of the
nut block and then bend all the strings up at a 90
degree angle behind the locking set screw (this
helps lock the windings to the core). Finally, cut
the strings again flush with the top of the nut
block. A layer of thick tape (electrician's tape)
over the cut ends will help avoid scratches and
puncture wounds. Another option is to not cut the
strings off at all but simply wrap then in a tight
loop above the nut block. This is the best approach
if you change strings frequently. If you choose to
cut string ends off, you must re-tighten the
setscrews to lock the string core in place. You can
now bring the strings up to pitch. Once in tune it
is necessary to push each string down as it passes
over the nut and the bridge, do this by pressing
down on the string with your thumbs on either side
of the bridge and also immediately in front of the
nut. This will establish the ends of the nodes at
the bridge and nut and make the bass intonate
correctly. If you are changing the gauge or brand
of string you should check the instrument's
intonation with a tuner .Be sure to check the
tightness of the "hold down" set screws before
going on stage.Updated Feb 3 2006